
Can This Magnetic Hybrid filter make your videos better?
Freewell V2 Hybrid VND+CPL

Freewell V2 Hybrid VND+CPL: https://geni.us/Freewell-V2-CPL-VND

Freewell VND CPL V2
Variable Neutral Density Filter
Circular Polarizer
Magnetic Stackable filters available too
Freewell V2 Hybrid VND+CPL: https://geni.us/Freewell-V2-CPL-VND
GLOW MIST: https://geni.us/Freewell-V2-GLOW-Mist

GLOW MIST 1/4
Magnetically works with VND CPL
Heavy duty build quality
Lightweight metal and glass
Can be used on its own
(Section on Glow Mist Filter below)

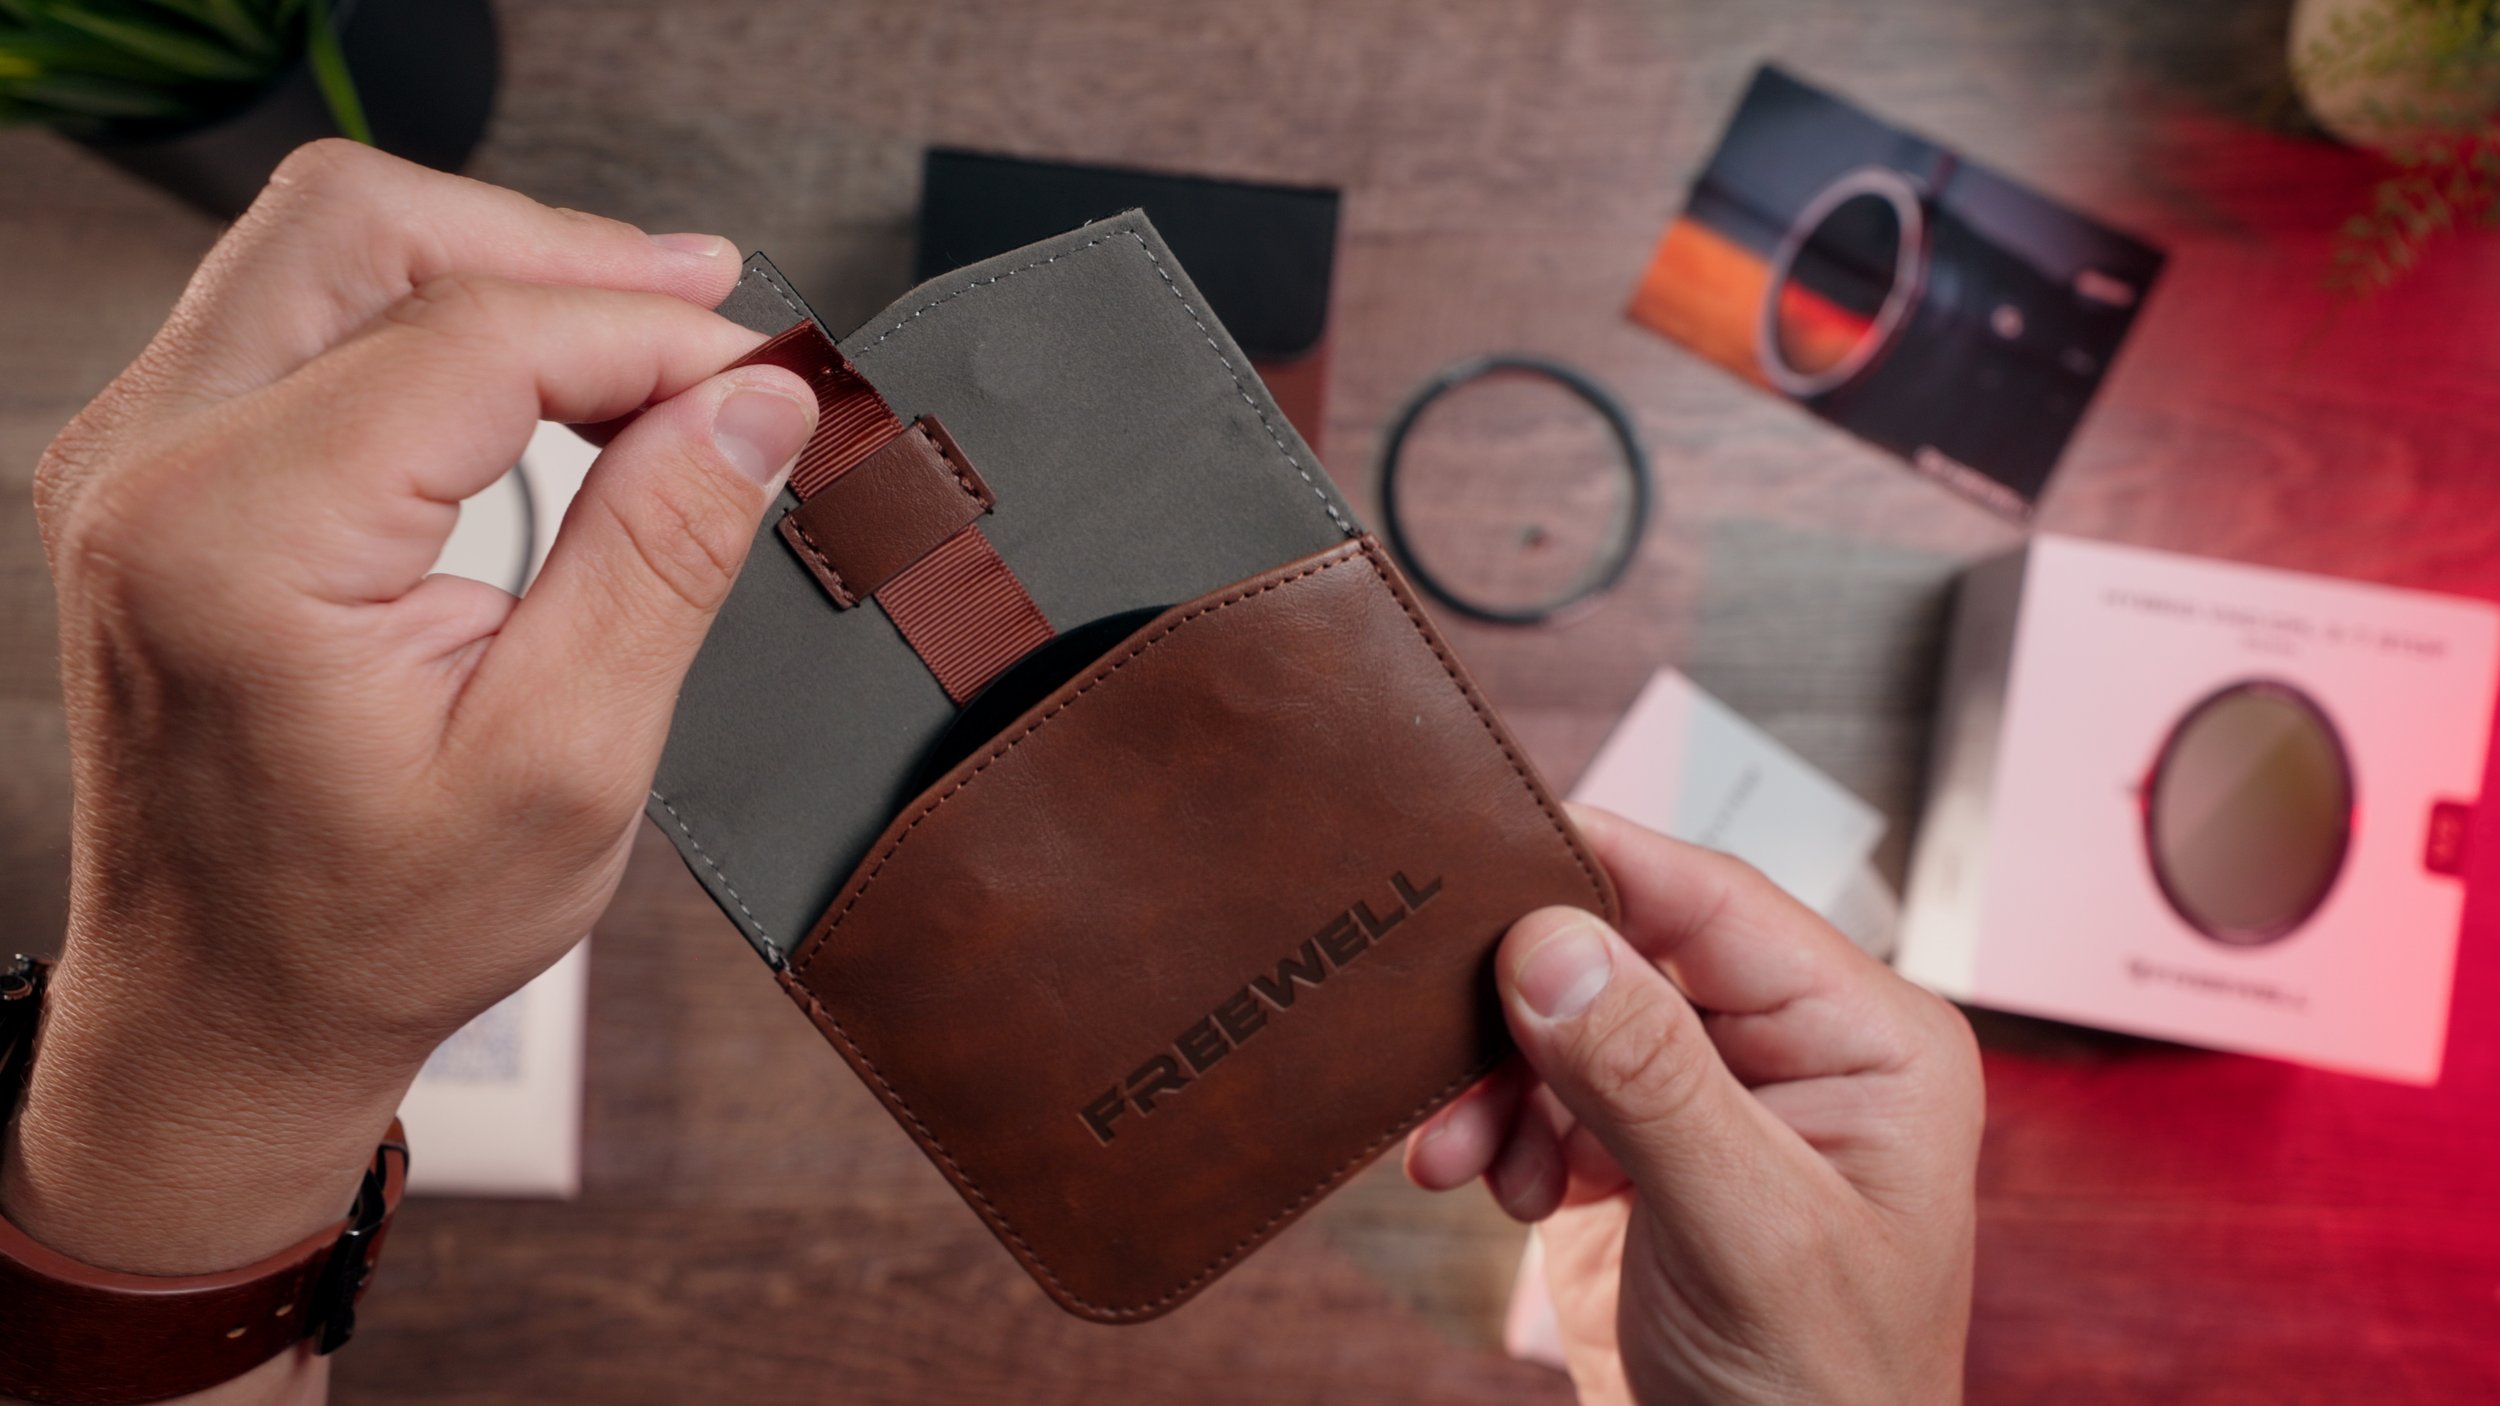
V2 leatherbound cases
The kit I got included the Glow Mist 1/4 filter
You can also get it without any additional magnetic filters.

Freewell VND CPL V2 on the FX3
Freewell V2 Hybrid VND+CPL: https://geni.us/Freewell-V2-CPL-VND
GLOW MIST: https://geni.us/Freewell-V2-GLOW-Mist
The Freewell V2 Hybrid VND+CPL is a new and improved Version 2 of the popular magnetic filter system from Freewell. You can stack magnetic filters on top of the VND CPL. In this video, we are going to dive deep into how to use this filter and how it is going to improve your filmmaking.
Video by:
RAY VALENCIA, FULL-TIME FILMMAKER WORKING IN TV PRODUCTION.
Video Chapters:
0:00 Freewell V2
1:06 Variable ND
2:00 180 Degree Shutter Rule
3:32 What You Get
6:00 Circular Polarizer
7:42 Color Charts
8:56 Glow Mist
10:04 Build Quality
11:11 Wide Angle Lenses
MUSIC by Audiio: https://audiio.com/partner?oid=1&affid=846
At Checkout TYPE IN THE CODE: valencia70
for 70% off your first year of UNLIMITED MUSIC AND SFX!

Freewell VND-CPL V2 on the Sigma 16-28mm

Freewell VND-CPL V2 on the DZOFILM 25mm Vespid

You have a metal loop sewn onto the backside and a carabiner, which makes it easy for clipping on your bag.

You can attach this directly to your bag. The case is also very rugged so I expect it to last for quite some time.
GLOW MIST: https://geni.us/Freewell-V2-GLOW-Mist

To open the case up, you pop the magnetic door open with this brown strap, Then you just pull the strap up to cascade out your filters for ease of access.
FIND yours:
Freewell V2 Hybrid VND+CPL: https://geni.us/Freewell-V2-CPL-VND
GLOW MIST: https://geni.us/Freewell-V2-GLOW-Mist
THERE ARE SEVERAL KITS AVAILABLE.
WHAT YOU GET:

Cleaning cloth

Extra Bolt

Labels/Stickers

Memory Card Slot
.
Freewell V2 Hybrid VND+CPL: https://geni.us/Freewell-V2-CPL-VND
GLOW MIST: https://geni.us/Freewell-V2-GLOW-Mist

There's a metal AB cap that can be used as a front or back cap, depending on which configuration you're in.

back side of A/B cap

And then there's the metal magnetic front cap that has a little finger loop, which just makes it a little easier for getting this off.

You get the 82 millimeter magnetic ring that you mount on your lens. And this is perfect because this is my largest diameter lens.

And here you have the CPL VND Version2.
Nice and easy to read white labels on the filter itself. Classic red ring that Freewell always has on their filters.
this filter is a 3 to 7 stops. So that's a really good range that relates to an ND8 up to an ND128.
Freewell V2 Hybrid VND+CPL: https://geni.us/Freewell-V2-CPL-VND
GLOW MIST: https://geni.us/Freewell-V2-GLOW-Mist

When it comes to the build quality of free well products, I can really, really trust it. Right now, I have the glow mist filter in between two magnetic caps, a front cap and it back cap. So I could just throw this glass filter in my bag, and it would feel secure and safe. And it feels like it's in a case.
I like that they added a little finger loop in the front because it is a very strong magnet. It is a little bit hard to pull this off, so I like having that instead of trying to dig your fingernails underneath it.
And then as far as the strength and how long I think this filter system will last, well, the whole thing is made completely of metal. There's like no plastic parts or anything like that on here. You have metal and glass, so really, really nice, high quality build.
If you're someone who likes to travel light, you can literally just pop this in your bag just like this with the front and back cap on it.


Adjust with the turn of the filter
In the past, if you wanted to use a circular polarizer and a neutral density filter, you had to carry two separate filters. And they were almost impossible to use together because of the cross polarization that you would get.
Now I have this new VAD and circular polarizer for Freewell, which has the two filters in one, and you can magnetically stack other filters on top of this one just like that.
SCG Pro T8 Tripod Fluid Head: https://geni.us/SCG-T8-fluid-head
SCG Carbon Fiber Tripod Legs: https://geni.us/SCG-tripod-legs
VND+CPL HYBRID FILTER:
The benefit of having a variable in ND is you're able to rotate it, and you can quickly see where you're at here, with the numbers marked on the side and the little arrow, just a quick little rotation and you can dial in your exposure.
So you can go from 3 stops to 7 stops. And if you just want to adjust the ND then you tighten the thumbscrews down…and now only the ND Turns.
WHY VARIABLE NEUTRAL DENSITY FILTERS?:

All right. So let's talk about why you would want to get a variable ND filter and a circular polarizer and why it's cool to have them both in one filter.

Under the Right conditions, You can use it to reduce reflections on water and glass.

CPL rotated
Now, some lower quality filters don't have the hard stops like this. And they just keep spinning and keep spinning. And then they get cross polarization which causes an X pattern. And it completely ruins the image. If you have a filter like that and you turn it too far, so with the stops on it, you're able to actually know exactly where you're at by dialing this in. And you're also able to rotate your polarizer if you want to increase the saturation of your sky.
CIRCULAR POLARIZER
This CPL filter can reduce reflections on glass and water from light that is bouncing around from the sun. It doesn't work if you're facing directly into the sun. It works best if you're facing 90 degrees away from the sun, but you can use it in direct sunlight to reduce reflections on certain things.

Sony 50mm f1.4 GM
This is the lens on the left with no filter. Stop down to an F16 and look at the background blur on the frame on the right. Although the main thing to note is that the white chip is pretty close to the same.
With this “true color” technology that Freewell has implemented here, they figured out how to get the polarizer working along with the ND’s, where you don't get all those crazy color shifts. So to me it is very cool to have all of that in 1 low-profile filter.
Variable ND’s are one of the first things that I recommend to beginning filmmakers get because you're able to open up your lens to its maximum aperture, which is the widest that it opens up to. Let's say you have an f 2.8 lens like this Sigma ART zoom lens, the 24 to 70mm.

SIGMA 24-70mm F2.8 ART lens
This is the lens on the left with no filter. Stop down to an F16 and look at the background blur on the frame on the right. Although the main thing to note is that the white chip is pretty close to the same.

This is the SIGMA 24-70mm lens on the left with no filter. Opening up the lens with each stop on the filter.
We are outside, so it isn’t the most scientific test (due to changing sun light) but no major color shifts.
The main thing to note is that the white chip is pretty close to the same.

Then if you want to turn your polarizer, you just make sure that the thumbscrews on the sides of the filter are loose
Now the entire polarizer can spin around freely.
The end makes it possible for us to fully open up this lens, and the polarizer gives us the capability to control the reflections.
SCG Pro T8 Tripod Fluid Head: https://geni.us/SCG-T8-fluid-head
SCG Carbon Fiber Tripod Legs: https://geni.us/SCG-tripod-legs
SIDENOTE for FILMMAKERS.
The 180 Degree shutter Rule
(for Natural looking motion blur in your videos)

23.976 ×2 = 48 or 1/48. Which becomes 1/50 in most consumer cameras
But there are also a couple rules that we have to follow whenever we are shooting a commercial or a movie.
It's called the 180 degree shutter rule.
180 degree shutter rule is where your shutter speed is double whatever your frame rate is. So let's say we're shooting at 24 frames a second like we are right now on the A7IV.
Well, 24 x 2 would be 48. And our A7IV camera doesn't have a 1/48. So we would go to 1/50.
And that is double your frame rate. So 1/50 for a 24 frame per second video.
Here on the SONY FX3 we have shutter angle. And we also have the 1/48 if we want to go to shutter speed. But anyways, for a regular dSLR camera or consumer camera, you're still going to want to abide by this rule to have the most natural looking motion blur

GLOW MIST MAGNETIC FILTER
You also have the option to add on these magnetic filters as well.
So now, I have essentially a polarizer a variable ND. And a GLOW MIST FILTER all stacked up right here in this low profile design. Whereas, I would normally have to carry a matte box and bring that along to stack up this many filters.
GLOW MIST: https://geni.us/Freewell-V2-GLOW-Mist

The glow mist is a diffusion filter, and it comes with a quarter mist by default. And that might be a little strong. So we're going to do a little bit of test. Comes with a leather pouch

Glow Mist
GLOW MIST: https://geni.us/Freewell-V2-GLOW-Mist

Fits in the main case

Glow Mist Comparison
GLOW MIST 1/4: https://geni.us/Freewell-V2-GLOW-Mist

Glow mist case

Magnetic Closure Pull Tab
Pull this tab to slide the filter upwards

Going to use a STEP UP Ring on this 16mm lens. The only problem is, I didn’t order any of the additional magnetic rings because they are kind of pricey. So I just used:
67 to 82mm. Step up Ring
You could always do this if you just want to use the one magnetic 82 millimeter filter with all of your lenses. You can just get step up rings but just note that adding extra space in between your lens and the filter could cause vignetting on certain wide angle lenses.

12mm DZOFILM with 77mm to 82mm STEP UP RINGS
GLOW MIST: https://geni.us/Freewell-V2-GLOW-Mist
OTHER GEAR I USE:
CAMERAS:
Sony FX6: https://geni.us/Sony_FX6
Sony FX3 https://geni.us/SonyAlphaFX3
Sony a7RIII https://geni.us/j6Ph
Sony ZV-E10: https://geni.us/SonyalphaZVe10
LENSES:
Sony 70-200mm GMii: https://geni.us/Sony70-200mmGMii
Sigma 24-70mm F2.8 ART: https://geni.us/Sigma2470ART
Sigma 14-24mm f2.8 ART: https://geni.us/Sigma1424ART
Sigma 35mm f1.4 ART: https://geni.us/Sigma35mmf14
Sony 90mm f2.8 G MACRO: https://geni.us/Sony90mmG
Sony PowerZoom 28-135mm: https://geni.us/Sony28135mm
(APSC) Sony 11mm f1.8 : https://geni.us/sony11mmf18
AUDIO:
Rode NTG5: https://geni.us/RodeNTG5shotgunmic
DEITY S-Mic 2S: https://geni.us/Deity_S-Mic-2S
RODE VXLR to 3.5mm ADAPTER: https://geni.us/RodeVXLRadapter
Sony XLR mic: https://geni.us/SonyECMXM1
Rode Video Mic Pro+: https://geni.us/RodeVMProPlus
Audio Technica Headphones: https://geni.us/AudioTechnicaM30X
COMICA BoomX-U QUA: https://geni.us/ComicaBoomXU_QUA
Comica BoomX-D2 PRO: https://geni.us/ComicaBoomXD_PRO
Comica CVM-DS-XLR Cable: https://geni.us/Comica_XLRsplitter
DEITY V-Mic D4: https://geni.us/Deity-vmicD4
Deity Pocket Wireless: https://geni.us/DeityPocketWirelessKit
Deity D4 Duo Mini Shotgun: https://geni.us/Deity
Vaxis Filters and Tilta Mirage Matte Box System:
VAXIS:
Vaxis Orange V-Streak Filter: https://geni.us/VaxisStreakFilter
Vaxis Rainbow Dazzle: https://geni.us/VaxisRainbowDazzle
Vaxis VI Star Cross: https://geni.us/VaxisVIStarCross
Vaxis Black Mist 1/4: https://geni.us/VaxisBlackMistQuarter
Vaxis Black Mist 1/8: https://geni.us/VaxisBlackMist8th
TILTA :
Tilta Mirage VND Matte Box KIT B: https://geni.us/TiltaMirageVND
Tilta Mirage BASIC KIT A: https://geni.us/TiltaMirage
Tilta Mirage MOTORIZED KIT C: https://geni.us/TiltaMirageMotorized
Tilta Mirage VND Filter: https://geni.us/TiltaMirage95mmVND
Tilta Nucleus Nano Wireless Focus: https://geni.us/TiltaNucleusN
Tilta Stackable Circle Filter Tray: https://geni.us/MirageStackableCircle
Tilta Stackable Square Filter Tray: https://geni.us/MirageStackableSquare
Dual (two) Circular Filters Holder: https://geni.us/MirageDualCircleFilter
==FX3 CINEMA RIG AND ACCESSORIES=
SMALLRIG FX3 HANDLE EXTENSION: https://geni.us/FX3handleExtension
SmallRig Wood Top Handle https://geni.us/SmallRigRosewoodNato
Rosewood Trigger Handle https://geni.us/SonyWoodHandleTrigger
SMALLRIG NINJA V CAGE: https://geni.us/NinjaVcage
SmallRig 2071 NATO Ballhead: https://geni.us/SmallRigNatoMagicArm
SmallRig Sunhood for Atomos Ninja V: https://geni.us/NinjaVSunhood
Monitor Mount with Locating Pins: https://geni.us/SmallRigMonitorMount1
SmallRig a7RIII Cage: https://geni.us/SmallRiga7R3Cage
Tilta FX3 Cage: https://geni.us/TiltaFX3
Tilta FX3 15mm Rod Baseplate: https://geni.us/TiltaFX3Baseplate
Tilta Wooden Left NATO Handle: https://geni.us/TiltaWoodenLeftVI
Tilta Mini V-Mount Kit I: https://geni.us/TiltaMiniVmount
POWER OPTIONS: Tilta 18650 Battery Pack: https://geni.us/Tilta18650
Moman Power99 Mini V-Mount Battery: https://geni.us/MomanPower99
Portable P-Tap/D-Tap Charger: https://geni.us/portable
DTAP Core SWX Neo 9 Battery: https://geni.us/CoreSWXneo9
Nucleus P-Tap Cable: https://geni.us/AlvinsPtapMicroUSB
This video is NOT sponsored by any companies, so feel free to use my links to show support for the channel if you enjoyed the video or learned anything new!
#scg #tripod #scgtripod
SUBSCRIBE FOR MORE VIDEOS!
Ray Valencia
Copyright of SHIPREC VISUALS, LLC 2024